
Fate of the Gods
Quest Details
The gods are returning to Gielinor but something is preventing the arrival of Zaros. Help Azzanadra to bring his god to Gielinor and find out more about Zaros and the elder gods along the way.
|
| Fate of the Gods | |
|---|---|
 The World Gate |
|
| Release Date: | 24th March 2014 |
| Developer: | Stephen R |
| Table of Contents | |
Quest Spoilers
| Warning: Spoilers below |
|---|
| This section reveals the rewards and storyline for Fate of the Gods – Spoilers. Although the items are hidden within a spoiler tag, it is advised that you do not proceed further down the page. |
Walkthrough
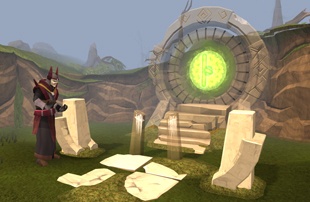
Opening The World Gate

Speak to Azzanadra who will inform you of the return of Zaros. There is just one problem – Zaros cannot return without your help. Accept Azzanadra’s quest, and equip a ring of visibility to see the World Gate. Speak to Azzanadra again and he will tell you that Zaros has requested the help of Sliske to bring the World Gate out of the Shadow Realm. Sliske will pull you into the Shadow Realm and offer you a proposal before telling you how to fix the World Gate.
Investigate the pillar behind Sliske to get the symbols, the click on the control consoles in front of the gate. The left console will rotate the symbols to the left, the right console will rotate them to the right.
| Items needed: |
| Step one | Step two | Step three |
|---|---|---|
 |  |  |
| Click the right console until you see this rune | Click the left console until you see this rune | Click the right console until you see this rune |
When you have entered the correct sequence of runes, Sliske will be able to bring the gate back from the Shadow Realm. After speaking to Azzanadra, step through the World Gate into Freneskae.
You’ll need to move through the area quickly as the land of Freneskae is dangerous:
- The air here is filled with smoke and will make you choke. This causes 50 life points worth of damage (reduced to nothing if wearing a face mask)
- Lightning can strike at any time causing a large amount of damage. Lightning strikes will be preceded by a flickering light on the ground. If you are hit by a lightning strike you will be damaged for 1500 life points, being near to a lightning strike will cause you 750 life points of damage.
- Volcanic vents will spew hot steam causing you damage if you are nearby. This cases 400 life points of damage.
- Balls of lava will drop from the sky. If you are hit by a ball of lava you will be damaged for 500 life points, being near to an impact will cause you 250 life points of damage.
- Walls leak lava onto passersby. If you are hit by the lava you will be damaged for 1000 life points, being near to the wall will cause you 500 life points of damage.
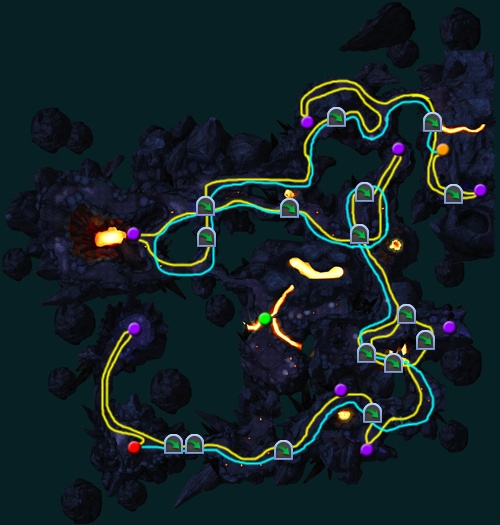
Move from the World Gate  towards Zaros’ Sanctum. You’ll need to cross a number of obstacles
  to get there. You will also find memoriam crystals
  along the way which can be clicked on to gather the crystals though these cannot be used at this time. Note also there is a bridge
  that cannot be crossed at this point. To get all of the memoriam crystals, follow the yellow path, to just head to Zaros’ Sanctum, follow the cyan path.
Accessing Zaros’ Sanctum
Once inside Zaros’ Sanctum, head north from the entrance  .
.
Click on the door  at the far end of the room to scare off whatever is knocking on it. You’ll need to unlock the door by working out the correct combination of symbols.
There is a memoriam crystal in this room, and you’ll also find a memoriam device  in the center of the room which you can click on to place any memoriam crystals you have found. You can view the memories linked to the crystals from this device.
Click on the dials to rotate them, all of the adjacent symbols need to match each other. There are three locks to remove in this fashion.
| Items needed: |
|
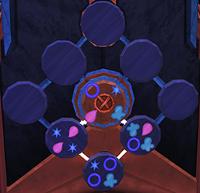 | 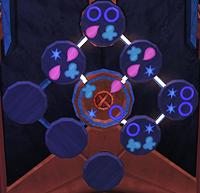 | 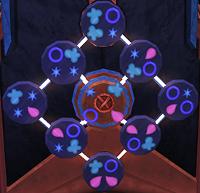 |
Lock 1 | Lock 2 | Lock 3 |
Once you have opened the locks, head through the mist and click on the opening  to move into the next area.
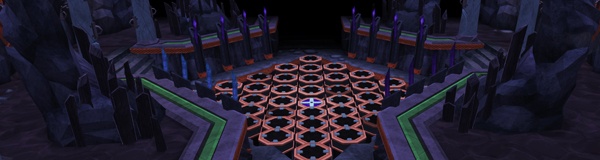
Stand in the center of the next room to activate the pressure pad  , and several nihil will charge out of holes in the walls.
Avoid the nihil’s charge attacks where you can, and hit them to make them stop in their tracks. It is best to approach from the sides to avoid their charges and get a hit in. You will probably find it best to fight them one at a time. There are four nihil to defeat, each with a normal attack, a charge attack and a special attack:
| Blood nihil ( Level 160 | No weakness ) | |
|---|---|
 |
Normal Attack – Melee – these attacks will heal all other nihil if they are in combat |
| Charge Attack – If hit when they are charging, a bleed Damage over Time (DoT) attack will be placed on you | |
| Special Attack – The nihil will crouch into a ball, during which time ANY damage it receives will heal it. | |
| Ice nihil ( Level 160 | No weakness ) | |
 |
Normal Attack – Magic – these attacks will drain prayer points. |
| Charge Attack – If hit when they are charging, your prayer points will be drained. | |
| Special Attack – The nihil will freeze you in ice. This attack can be escaped as normal with the Freedom and Anticipation abilities. | |
| Shadow nihil ( Level 160 | No weakness ) | |
 |
Normal Attack – Ranged – these attacks are shadow based. |
| Charge Attack – This attack will cause darkness based on the nihil’s proximity to you, regardless of whether you are hit by the nihil or not. | |
| Special Attack – The nihil will place a shadow trap under you which causes large amounts of damage while you are within its boundaries. | |
| Smoke nihil ( Level 160 | No weakness ) | |
 |
Normal Attack – Magic – these attacks are smoke based. |
| Charge Attack – If hit when they are charging, your combat stats will be drained. | |
| Special Attack – The nihil will spawn a virus cloud under you, causing a rapid stat drain while you are within its boundaries. | |
Once the nihil are defeated, exit the area through the door to the north. Note that there is a memoriam crystal in this room near the exit.
Meeting Zaros
Zaros will teleport you into your own mind so that he can speak to you more clearly and without Mah finding out his plans. His only way of gaining corporeal form is beneath Mah and Zaros needs your help to get at it. You can ask Zaros about his past and his plans before making the choice to help him. You need to find out how Zaros was made, and what he will need to make his new form (you can always say you’ve made up your mind and ask that Zaros give you the crucial information).
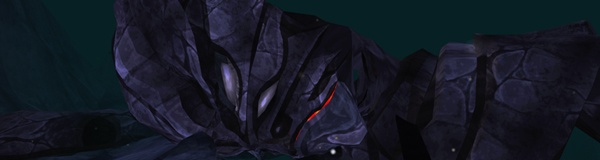
Exiting Zaros’ Sanctum you will climb up a mountain and find yourself in the crate of a volcano. Approach the statue in front of you and Zaros will appear to speak to you. He explains the statue is not a statue, but Mah – an elder god.
| Items needed: |
|
When you have heard what Zaros needs, he will tell you that you must survive Mah long enough for her nightmares to subside. Zaros can help you, but you’ll need to let him inside your mind. Decide whether you want to allow this or not, and you’ll be sent back to the volcano crater.
Approach Mah to begin the fight. Mah will dream into existence muspah of three types: ranged, magic and melee. You’ll need to survive for a set amount of time – roughly 5 minutes.
The muspah are level 150, have a large amount of life points and are weak to spells cast from the Ancient Spellbook. For each muspah killed, another will spawn after a small delay. The replacement will be picked at random.
Mah’s herself will ‘attack’ the player with violent screeches that send out a shockwave that stuns you and causes 1/5th of your maximum life points in damage. Mah’s attacks will also damage the muspah by a large amount.
As the fight progresses, Mah’s attacks will become more frequent and more muspah will spawn.
If Zaros is inside you, you will have infinite prayer points and runes for spells from the Ancient Spellbook.
Once the fight has finished, Mah will run out of power and fall back to sleep. Any remaining muspah will dissipate into the ether.
Climb down the ledge to the east of Mah’s face and you’ll find yourself within the volcano.
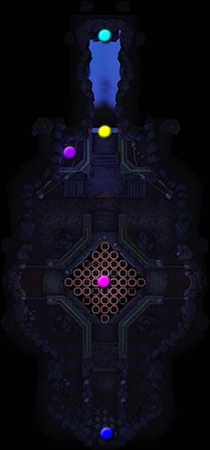
Within The Elder Halls
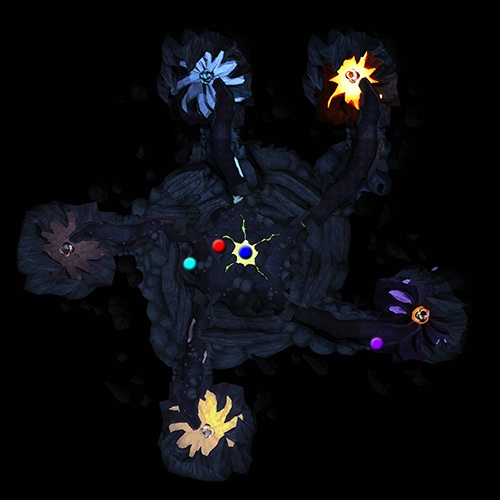
You will find yourself in the Elder Halls of Freneskae. Note The Measure in the ground. Its pulses will reveal hidden mah wisps which you will need to harvest from. Pick up the measure and you’ll see translucent wisps where you walk. Place the measure down in order to make the wisps solid so that you can harvest from them. You’ll need to collect 250 mah energy from the wisps. Any gained memories can be converted into energy at the rift in the center of the room.
| Items needed: |
| None |
When you have 250 mah energy, weave a divine simulacrum of either colour depending on whether you want to help or hinder Zaros (a dark one is what was requested, and a light one will reject Zaros), then exit the area via the rock face .
Note there is also a memoriam crystal in the Elder Halls.
You’ll find Zaros waiting for you in front of Mah. Speak to him and offer him the simulacrum of your choice. Your choice of simulacrum will determine Zaros’ appearance but he won’t have time to thank/chastise you, as Mah will being to stir in her sleep again…but this time she is actually waking up. Zaros will teleport you away to the World Gate. He will explain something to you before Mah becomes too close and you must escape through the gate.
On the other side speak to Azzanandra, and confirm that you’re ready for Zaros to return. When you have seen all of Zaros’ orders to his followers, and accepted the Shard of Zaros, your quest will be completed.
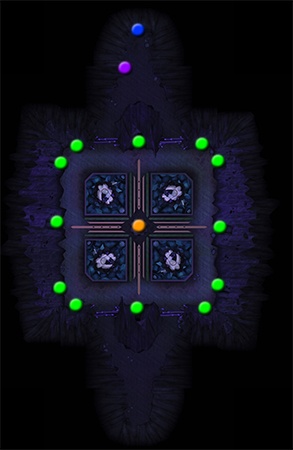
Note that at this point, having gathered all the memoriam crystals, you are still 5 short. These must be gathered on Freneskae.
Four of which can be found in the approach area, as the bridge that was previously inaccessible can now be crossed. Tag the glowing crystals to build up a static charge. This will attract lightning to the area making it more dangerous for you to be there. After enough charge has been built up, one of the four crystals will be unlocked and the static charge will dissipate. Repeat this process for the remaining 4 crystals.
The final purple crystal can be found in the volcano crater, where Mah was sleeping.

Rewards
| Experience | Other | Quest points |
|---|---|---|
|
125,000 Magic XP 100,000 Divination XP 100,000 Slayer XP 75,000 Agility XP 50,000 Summoning XP |
Access to Freneskae Four elder chronicles providing 50,000 Divination XP For having completed the recommended quests: New teleport on the Sixth-Age circuit ^ Able to see into the Shadow Realm without the ring of visibility + For finding all of the memoriam crystals: Crest of Seren (finding all blue crystals) Helm of Zaros (finding all purple crystals) |
2 |
* Requires the completion of The Temple at Senntisten. Speak to Azzanadra inside The Senntisten Temple.
+ Requires the completion of the Ritual of the Mahjarrat and The General’s Shadow. Enter the throne room of the Empyrean Citadel and attempt to leave.
& Requires the completion of the Ritual of the Mahjarrat. Speak to Ali the Wise (Wahisietel) in Nardah.
^ Requires the completion of The World Wakes. Speak to the Guthixian High Druid in Guthix’s Chambers
Development Team
|
||||||||||||||||||||||||||||||||||||||||||||
Recorded at OM London.